Author

david

Browsing

What is vlogging?

Vlogging is just one of the many ways to earn while at home. It’s the act of recording video content for an online audience. The term vlog or video blog generally refers to both the format and the content, while the term vlogger is for the person who has ownership of the vlog. A vlogger isn’t always the subject of the video nor are they always the person behind the camera.

How do I become a vlogger?

Anyone with a camera, a computer, and an Internet connection can vlog. Aside from creating content, however, you also need a platform on which your audience can access said content. YouTube is the most popular platform for vloggers at the moment, but you can also sign up at other channels like Vimeo and Dailymotion.

What kind of vlogs should I make?

You can choose from a wide variety of topics, subject to the guidelines of your chosen platform, but it’s recommended that you vlog about something that you’re genuinely interested in. Some vloggers choose to focus on a single interest, such as fitness or parenting, but more and more vloggers are expanding their repertoire, combining multiple interests for broader appeal. If your main goal is to earn from vlogging, you can also base your content on the kind of advertisers you want to attract. Whatever you decide, keep in mind that vlogging is a responsibility, and that your words and actions can greatly influence your audience.

How long do I need to wait before I can monetize my vlog?

It depends on which revenue stream you’re interested to tap, and even then, the requirements vary. On YouTube, for example, you can start earning from ads if you join the YouTube Partner Program, have more than 4,000 public valid watch hours in the last 12 months, have more than 1,000 subscribers, and are linked to a Google Adsense account. Meanwhile, the parameters for brand sponsorships are relative to each brand. The bigger the brand, the more they’ll want to work with vloggers who have more subscribers and whose videos get more views. Numbers aren’t the only factors they consider though. The vlogger’s personality, language, and character also determine whether they’re a good fit for the brand or not.

How can I earn from vlogging?

There are several ways you can earn from vlogging. You can allow advertisers to run ads on your channel, collaborate with brands to create brand-sponsored content, share affiliate links, and offer exclusive content. Before you can tap into these revenue streams, however, your vlog needs to meet the requirements set by either the platform, the advertiser, and ad or affiliate network. These may include, but are not limited to, the number of views and subscribers your vlog generates.

How do vlogs make money from ads?

Vloggers earn from ads when they allow advertisers to run ads on their channel. These ads can appear in a variety of ways—from skippable ads within the video to transparent overlay ads that only appear at the bottom 20% of the video. To unlock this revenue stream, however, you need to meet the minimum requirements of your chosen platform (e.g. YouTube) and ad network (e.g. Good Adsense). As stated above, for example, YouTube requires that you become a member of the YouTube Partner Program, have more than 4,000 public valid watch hours in the last 12 months, have more than 1,000 subscribers, and are linked to a Google Adsense account before you can earn from ads.

It’s also important to note that you’re not going to earn much from one video and one ad alone. According to Influencer Marketing Hub, a YouTube channel earns an average of $3 to $5 per 1,000 views. Some platforms also don’t allow you to cash out your earnings until you reach a certain amount or payment threshold. Avoid confusion by making sure you’ve read and understood the terms of use and policies clearly.


Vloggers can earn from sponsored ads.

What is brand sponsorship?

Brand sponsorship is when brands contract vloggers to talk about their product or service in their vlog in one way or another. While different advertisers have different minimum requirements in terms of views and subscribers, checking out the stats of vloggers who have scored brand sponsorship deals can give you an idea of what advertisers are used to working with. Don’t just look at the high-profile vloggers; see if you can find vloggers who have stats that are closer to your current profile.

While the terms of the sponsorship are between you and the advertiser, you still have to respect the guidelines your video platform has set up regarding paid promotions. Some of these include informing them that you’re uploading a video with paid content. Make sure you review your chosen platform’s guidelines properly to avoid being penalized. 

What is affiliate marketing?

Affiliate marketing is basically a revenue-sharing agreement between you and an advertiser. Every time you recommend a product or service on your vlog that leads to a sale, you earn a commission. Using affiliate links, which vloggers usually put in their video’s description, advertisers can trace which sales can be attributed to you.

To get into affiliate marketing, you can join affiliate networks like Involve Asia or scout around for advertisers who have existing affiliate programs. Zalora and Lazada both have affiliate programs that you can explore.

What is exclusive content?

Creating content allows vloggers to earn from a variety of revenue streams like ads and brand sponsorships, but content by itself can also be a source of income. Once you feel that you have amassed a relatively loyal following, you can choose to create exclusive content or content for viewers who are willing to pay extra or make a donation. On YouTube, you can activate this by applying for a channel membership, which allows you to offer members-only perks to your viewers. Take note that these perks aren’t just limited to exclusive videos; they also extend to custom badges and emojis, among others. Interested in applying for channel membership on YouTube? Go through their eligibility requirements and policies here.

Vlogging is just one of the ways you can make the wealth generation cycle work for you. Once you start monetizing your videos, think about how you can best utilize your earnings. Do you save it, invest it back in the vlog, or explore a new venture? 

SCREENCAP: YouTube

Nais mo bang kumita gamit ang iyong sasakyan? May iba’t-ibang paraan para kumita gamit ang iyong sasakyan. Madami na ngayon ang mga kumpanya katulad ng Lalamove, Grab, Transportify, Joyride at Angkas na nag-aalok ng paraan upang kumita gamit ang iyong sasakyan. Kung meron kang Sedan, L300 or Light truck, pwede mong pagkakitaan ang Transportify. Narito ang mga dapat mong malamn bago ka mag-apply sa Transportify.

Read Next: Boundary Hulog Program

What is Transportify?

Ano nga ba ang Transportify? Is Transportify a scam? Paano ba ang Transportify Application process? Katulad din ng, Grab at Lalamove, ang Transportify ay isang legit na courier service company kung saan ang customer ay pwede magpadala ng gamit mula sa pick up destination papunta sa nais na drop off destination. Ang Transportify driver ay kumikita sa bawat customer na kayang pagseserbisyohan.

Transportify Driver Earnings

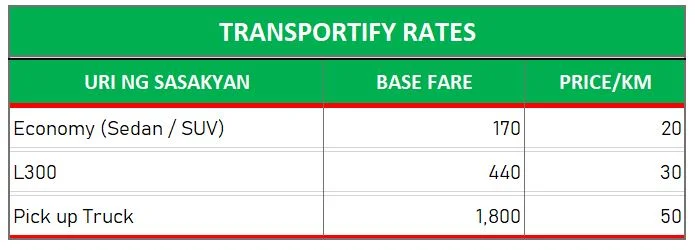
Magkano ang kita sa Transportify? Ang isang Transportify driver ay maaring kumita ng hanggang 282,000 Pesos kada buwan. Ang kikitain mo ay depende sa sasakyan na iyong gagamitin, sa layo ng pick up and drop-off destination at sa dame ng customer na iyong pagseserbisyohan. Narito ang rates ng Transportify na pwede mong gamitin para ma-compute mo ang iyong pwedeng kitain sa isang araw.

Transportify Rates

transportify rates
Gamitin ang rates na ito para macompute ang pwedeng kitain.

Sample Driver Earnings Computation for Economy Bookings: Kung ikaw ay may 5 customer bawat araw at may average distance na 5 kilometers per booking, ikaw ay kikita ng 35,100 Pesos Per month (Gross income). Bawal bumiyahe ng coding kaya 26 days lang ang ating ginamit sa sample computation.

1,350 Pesos Daily Income = 170 Pesos + (20 Pesos x 5 Kilometers) x 5 customers

35,100 Pesos Monthly income = 1,350 Pesos Daily income x 26 days

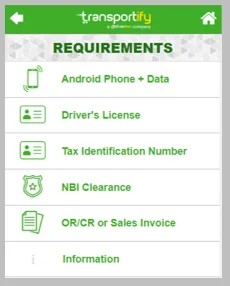
Transportify Application Requirements

  • Mobile Phone + Data – Nirerequire ng Transportify ang nasa version 5.0 at pataas.
  • Driver’s License – Tinatanngap ng Transportify ang professional o non-professional driver’s license as long as validated ito ng three months.
  • Tax Identification Number (TIN) – In compliance with local legal requirements, at para na rin malaman ang pagiging lehitimo at ang iyong identity.
  • NBI Clearance – Kailangan ng original copy ng NBI Clearance para mavalidate ang records mo. Maaaring isubmit ito within four weeks upon activation upang makapagsimula na ng maaga.
  • OR/CR or Sales Invoice – Ito ang magpapatunay na ikaw ang may-ari ng sasakyan. Kung bago ang sasakyan at wala pang OR/CR, maaaring gumamit ng Sales Invoice.
  • Information – Para sa application.
  • Cash Deposit – Ang pag-aapply at pagattend sa seminar ay libre. ngunit kailangang maghanda ng 500Php. 150Php para sa Gcash kit at 350Php para naman sa Initial top up o sa iyong driver’s wallet.
  • Goverment ID – Kailangan nito maliban sa driver’s license, NBI Clearance at TIN.
  • Accepted Vehicles – Maaaring gamitin sa Transportify ang sedans, hatchbacks, and SUVs/MPVs (2004 model). Maaari din ang FB type vehicles tulad ng L300FB, H100, Kia K2700, NHR, at Foton Tornado. Inaaccept din ang Van type gaya ng HiAce, Grandia at Urvan.
Requirements

Paano mag-apply sa Transportify?

Step 1: Idownload ang mobile app for Android or IOS or mag sign up sa Transportify website.

Step 2: Ifill out ang application form. Siguradihing tama ang detalye na ilalagay sa form. Icheck kung tama ang mga impormasyon at pindutin ang submit button. After isubmit ang application, hintayin ang tawag o text mula sa Transportify.

transportify application

Transportify Seminar Schedule

Upang maging full-fledged transporter ng Transportify, pagkatapos makumpleto ang requirements, required din na umattend ng training. Kasama sa training ang orientations tungkol sa Transportify company, rules and regulations, protocols at iba pang mga posibleng maencounter mo bilang Transportify driver. Tatalakayin din dito ang iba pang mahahalagang impormasyon na kailangan mong malaman. Mayroon ding examination or Q&A portion sa seminar-training upang makasiguro na well-equipped ang mga drivers.

Alam mo ba na mas malaki ang kita kapag pinag sabay mo ang Transportify at Grab? Tignan dito kung paano mag-apply sa Grab.

Transportify Driver’s Benefits

Ikaw ang boss – sa Transportify, hawak mo ang oras mo. Pwede kang magbook anytime at kahit saang location mo gusto. Maaaring immediate, scheduled o full-day.

Kumita gamit ang iyong sasakyan – Maaari mo ng pagkakitaan ang iyong private car sa Transportify.

Mas mataas na kita – Nasa sa iyo kung ilang bookings ang tatanggapin mo sa isang araw. More bookings, more earnings. Pwede kang magpart-time o full-time dito.

Frequently Asked Questions (FAQs)

Magkano ang registration fee?

Walang registration fee sa pagaapply sa Transportify. Ito ay libre.

Paano ang mode of payment?

May dalawang mode of payment depende sa type of booking na iyong pinili. Maaaring direkta mula sa customer (cash) o ‘di kaya naman ay ihuhulog sa iyong bank account tuwing Tuesday.

Mayroon bang training?

Yes. Mayroong driver’s training na tatagal mula dalawa hanggang apat na oras.

Maglano ang kikitain sa Transportify?

Ang driver earnings o kita ay depende sa sasakyan na iyong gamit at sa bookings.

Who can apply for Transportify?

Sino nga ba ang pwedeng mag-apply? Kung ang edad ang pag-uusapan, walang age limit para sa mga drivers na nais mag-apply. As long as capable ang driver na magdeliver at mayroong siyang driver’s liscense, maicoconsider na siya na kwalipikado.

Do I need a Professional Driver’s License to apply?

Marami ang nagtatanong kung kailangan ba ng professional driver’s license para makapag-apply sa Transportify. No, sapat na ang driver’s license para makapag-apply sa Transportify.

Coverage area of Transportify

As long as it can be transported by land from Luzon.

Ilang araw bago magstart pagkatapos ng application?

Madali lang ang pag-aapply sa Transportify. Maaari kang mag-apply at magstart on the same day. As long as kumpleto na ang requirements, maaari ng iactivate and start onboard.

We often classify big-ticket items as assets because we spend a lot of money on them. As a result, we assign more value to them than our other purchases. We also consider items as assets when we believe that they will “pay off one day.” While assets are sometimes worth some money and should be of some benefit to us in the future, we also have a tendency to stretch this definition. In fact, what we often think of as assets are actually liabilities.

Accountants define assets and liabilities based on how they would appear on a balance sheet. However, Robert Kiyosaki, author of Rich Dad, Poor Dad, has a simpler definition that makes more sense on a personal level. According to him, an asset is something that puts money in our pocket, while a liability is something that takes money out of it

A case of mistaken identity

A car, when bought for personal use, makes our life more convenient, but is it an asset? Based on Kyosaki’s definition, it’s not. On the contrary, it’s a liability because we end up throwing money at it long after we’ve bought it. We pay for gas, maintenance, and insurance. Sure, we can always sell it after, but by the time we do, its value will have almost always depreciated.

Other items that masquerade as assets or investments include gadgets, travel, and credit cards. Yes, they probably make our lives better on some level, but they don’t put money in our pocket.

The same principle applies to our home. It’s not an asset until it makes us money. One could argue that, unlike the previous examples, real estate actually appreciates in value. One could also say that our home will eventually be worth more than what we originally spent for it. While both statements are true, it’s also true that until then, it’s a liability. Why? Because if there’s one thing that life has taught us, it’s that we shouldn’t count our chickens before they’re hatched.

Consider the current situation. In the last few years, a number of people might have taken the plunge and bought their own home, thinking that it would make for a good investment one day. They’re not necessarily wrong, but they probably didn’t expect a pandemic either. To be fair, no one did. Now, some of them might have lost their jobs or taken pay cuts, which, in turn, might have forced them to sell their home. The really lucky ones might have been able to sell theirs at a profit, but most of them, well, they might consider themselves fortunate just to find a buyer. 

Even without the pandemic, which is admittedly an extreme situation, there are a number of different scenarios that could have played out, and until all the cards are laid out, it’ll do us good to think of our house as a liability and not an asset. 

The benefit of knowing which is which

The point of emphasizing the difference between assets and liabilities isn’t to devalue existing purchases, but to avoid putting more stock into them than we should. It’s not meant to scare anybody into not making purchases or taking risks, but to make sure that we make informed decisions every time we do.

Once we understand the difference between assets and liabilities, we stop making too many decisions based on the vague, and sometimes false, expectation that “it will pay off one day.” We ask ourselves, for example, whether a car is really something we need without inaccurate projections about its potential value clouding our judgment.

Being fully conscious that we’re accumulating liabilities and not assets, should also make us rethink our wealth strategy. How can we acquire more assets instead of liabilities? Find out how assets help sustain the wealth generation cycle when you click here

In a country where one’s financial security is strongly associated with one’s ability to hold down a 9-to-5 job, the idea of earning money at home still isn’t seen as a legitimate career option. “Scam ba ito?” we’d ask ourselves. “Can you really earn money at home in the Philippines?”

Such misgivings are normal—expected even—but if the ever-growing popularity of social media and other online platforms across demographics tells us anything, it’s that the local landscape is ripe for digital transformation, and with that shift come opportunities for online work for Filipinos. Here are some ideas you might want to consider:

  1. Blogging or vlogging
  2. Doing freelance work
  3. Online selling

Blogging or vlogging

If you enjoy creating content and sharing them with other people, you can create a blog or vlog, depending on whether you prefer your content to be read or watched. The term blog was derived from the word weblog, while vlog is short for video blog.

Things you’ll need to set up a blog or vlog

To set up a blog, all you need is an Internet connection, a laptop, your actual content, and a platform to post your content on. There are plenty of free and reliable platforms for blogs, including WordPress and Blogger. You don’t need to know how to code either as both platforms have ready templates to choose from.

The requirements for setting up a vlog are more or less the same with a few important additions: a camera and an editing software or app. If you’re just starting out, there’s no need to buy the latter. There are plenty of free ones such as OpenShot, VSDC Video Editor, and even Windows Movie Maker.

How to earn from blogging and vlogging

If you want to earn from blogging or vlogging, the first thing you need to make sure is that your blog or vlog generates enough traffic and that it has plenty of high-quality content. To the uninitiated, this simply means that it should be popular enough that a lot of people visit it often and that you offer your audience content that they will find useful. Getting to this point may take some time, however, so you might want to consider if blogging or vlogging is worth it in the first place.

There are several ways you can earn from both:

  1. Earn from ads
  2. Brand sponsorship
  3. Affiliate marketing
  4. Exclusive content

Earning from ads

You can earn from ads when you sign up for an ad network and allow advertisers to run said ads on your blog or vlog. The most popular ad network for both bloggers and vloggers is currently Google AdSense, which has its own set of policies you’ll need to study well, so that you can get approved. Yes, you read that correctly. Not all blogs or vlogs that sign up for Google AdSense get accepted. 

As mentioned earlier, your blog or vlog needs to have enough traffic and high-quality content before it can start earning. Perhaps to help make sure blogs amass a decent amount of both, Google AdSense actually requires them to be active for at least six months.

Vlogs and their platforms also have their own set of policies apart from those of Google AdSense. YouTube, for example, requires vlogs to be part of the YouTube Partner Program, have a minimum of 4,000 public valid watch hours in the last 12 months, have more than 1,000 subscribers, in addition to being approved by Google AdSense, before they can start earning from ads.

How much you’ll earn is dependent on the policies set by your platform and chosen ad network, and of course, your blog’s or vlog’s actual performance. However, don’t expect too much right from the bat. Case in point: According to Influencer Marketing Hub, a YouTube channel earns an average of $3 to $5 per 1,000 views.

Earning from brand sponsorship

Another way you can earn from your blog or vlog is through brand sponsorships or when advertisers hire you to write or talk about their brand. While setting this up isn’t as complicated as when you’re trying to earn from ads, you’ll still want to read up on your platform’s policies, as they might require you to tag your blog post or vlog as an ad or clearly specify that you’re putting out paid content.

As with all revenue streams, two important factors help determine eligibility: traffic and content. After all, why would advertisers work with you if nobody is reading or watching your content? Every advertiser, however, has their own definition of good traffic and good content. It’s all arbitrary, but in general, the bigger the blog or vlog, the bigger the advertisers they attract. 

Unlike earning from ads where profits are predetermined by the policies set by your chosen ad network or platform, how much you get paid from brand sponsorship deals is between you and the advertiser. It’s therefore good practice to have a set of rate cards ready in case the opportunity presents itself. A rate card is essentially a table of fees for your services. If you don’t know how much to charge for anything, try to research the average rate for sponsored blog posts or vlogs, and then adjust based on what you think your blog or vlog is worth. Different creative executions can warrant different rates. As your blog or vlog grows, you can always update them accordingly.

Earning from affiliate marketing

If you’ve entertained thoughts of blogging or vlogging in the past, you might have come across the term affiliate marketing several times. It can sound a bit intimidating, but it’s actually just advertisers hitching a ride on your blog or vlog to get your audience to purchase or sign up for their product or service. In a nutshell, you’re given a link that leads to their website and every time someone makes a purchase or signs up—or every time they “convert” as digital marketers say—you earn a commission.

To unlock this revenue stream, you need to join an affiliate network like Involve Asia or a brand that has an existing affiliate program like Zalora. However, application doesn’t mean approval. Yes, just like when you apply for an ad network, affiliate networks and programs can say no to your blog or vlog. Reasons for rejection vary depending on the network or brand, but a non-functional blog or vlog or methods of promotion that don’t comply with the network or brand’s rules are some of the common culprits.

It’s recommended that you study the policies mandated by your chosen affiliate network or program before you even sign up, so you know exactly what you’re dealing with. If you have any questions, most of these entities have helpful FAQs on their websites. Don’t hesitate to do more research online or email their support center either.

Earning from exclusive content

Another way you can monetize your blog or vlog is by offering your audience exclusive content. If you think that they would enjoy seeing, say, what happens behind the scenes when you stage a photo shoot or if they want to know more about your creative process, you can offer them access to that content for a fee or a donation.

Again, different platforms have different rules; they also have features you can maximize. WordPress has Premium Content Block, which allows blog owners to restrict content to paying members only. Unfortunately, this is a feature that’s only available for paying WordPress users. On YouTube, you’re allowed to offer exclusive content when you apply for a channel membership. Read about the policies and eligibility requirements of YouTube’s channel membership here.

Doing freelance work

If you’re interested in how to earn money at home without any investment, freelancing is a very viable option. As a freelancer, you can accept work from different clients at different times. Not all freelance work can be done at home, but there are certainly plenty that fall into the category, including writing, art, data encoding, web design, web development, consultancy, community management, and even some forms of photography.

What you need to set it up

As a freelancer, your clients aren’t likely to provide you the same technical support you might expect to receive as an employee. If you’re a virtual assistant, no one will give you a laptop. If you’re a video editor, you’ll be expected to use your own editing software. Clients won’t usually spend for your Internet connection either. Therefore, it’s important that you already have the proper equipment and tools that are expected for the jobs that you want to take. You can choose to invest in them, of course, but that’s not a decision that you should make lightly, especially if you don’t have jobs waiting for you in the pipeline.

That said, there’s plenty of work to be found through the Internet or word of mouth. Go through Facebook hiring pages, sign up for freelance portals like Upwork, or reach out to family and former colleagues. While you’re making connections, don’t forget to prepare a portfolio of your work. You can choose to send it to your potential clients as a PDF document—Canva has free and well-designed templates you can use—or you can create a website that they can easily check out online. Some freelance desks also have built-in features on their website that allow you to upload sample work.

How to earn from freelancing

The great thing about being a freelancer is that you usually get to set your own fees. Think carefully about the value of your work and create a standard rate card or table of fees for your services. If you’re a writer, for example, have standard fees for articles with certain word counts. How much will you charge for a 500-word article as opposed to a 1,500-word one? When possible, include important caveats when you send your rates as well. Is there a maximum number of revisions you’re willing to make? How much time do you need to get the job done?

If you’re using a freelancer portal, you’ll most likely be asked to specify your proposed rate when you apply for a job. However, keep in mind that the portal will likely take a cut from your proposed fee—after all, they, too, need to earn. Just make sure you review the portal’s policies carefully, so that you’re not blindsided by extra charges.

During your freelance journey, you might also encounter the term retainer fee, whose nature, in our experience, varies from client to client. There are clients who use retainer fees as a means to get discounted rates in exchange for guaranteed work for a period of time. Others promise a minimum amount upfront even if the value of the work commissioned during the agreed time period turns out to be lower than the retainer fee.

Regardless of how much work you get or through which channels you get clients, remember to do your best every time. Freelancers depend on good feedback for work. One happy client can lead to two more jobs from others in the same way that an unhappy one can make offers dry up.

Online selling

These days, e-commerce, or the act of buying and selling goods via the Internet, has become the norm. Almost anything can be bought and sold online. You can peddle handmade trinkets, baked goods, or even secondhand items.

Things you need for online selling

As with any business, capital is important. It’s not just used to pay for goods upfront, but also to build your online store and make sure people actually find it—the Internet is called the World Wide Web for a reason. Let’s go through each.

Paying for goods

Whether you’re sourcing your products from a supplier or creating them yourself, there is a corresponding cost. However, if you’re planning to source your products from suppliers, there is a way to avoid paying for the goods outright. You can even wash your hands off managing inventory and facilitating delivery. This is a retail fulfillment method known as dropshipping.

The first thing you need to do is find a supplier amenable to dropshipping. There are many online marketplaces for this. Oberlo, owned by e-commerce giant Shopify, is one. Another popular marketplace is Doba. Working with these dropshipping companies allows you to focus only on selling. Once you close a sale, that’s the only time the product is bought from the supplier, who in turn, will manage inventory and customer delivery.

While dropshipping eliminates the need to buy and maintain stocks, it does have some downsides. One of them is precisely the fact that you don’t have stocks on hand. Another is that you only earn a percentage of the sale, so you might not earn as much as if you had more control over pricing. What you earn might not necessarily be worth the costs of the e-commerce platform or online store and digital marketing either. Then again, you could also be lucky enough to end up with a highly coveted product.

Setting up an online store

If you’re doing dropshipping, there are several recommended e-commerce platforms: Shopify, Magento, and WooCommerce, BigCommerce, and OpenCart. Some of these are free, while others are paid.

If you plan to go about it the old-fashioned way, you have more options. You can sell on Shopee, Carousell, Facebook Marketplace, and Instagram.

Engaging in digital marketing

Since the Internet is already crowded with online sellers, it’s hard to get noticed without a little help. The good news is that most e-commerce platforms have developed marketing solutions to help you. For a fee or for participating in their discount schemes, you can be part of their featured list of sellers, appear top on the list of results every time, or get some sort of marketing boost. If you’re on social media, you can also try doing paid advertising and launch sponsored Facebook or Instagram ads to target more of the right people.

If you don’t have much in the way of a marketing budget, there are other ways to get the word out. Reach out to friends and family and have them try your products. If they’re happy, ask if they can kindly recommend you to their friends or help you spread the word on social media. Ask them to tag your store’s social media account or link your online store on their own pages. Every little bit helps.

How to earn from e-commerce

Running an e-commerce operation is just like running any business. There are risks and rewards. Ultimately, it’s up to you to decide whether the effort is worth the profit.

Most people who want to know how to earn money online have inflated expectations. They think that the returns are easy, fast, and guaranteed. Like any venture, however, all of the items listed above require hard work, strategic decisions, and a little bit of luck. As you decide which one will best suit you, keep in mind that this is just one aspect of the wealth generation cycle. The best way to keep it going is to make something out of what you earn; save it or invest it, but don’t just mindlessly spend it.

PHOTO: Pexels
Karamihan ng kumuha ng boundary hulog sa motorsiklo sa amin ay rider ng FoodPanda at ibang pang motorcycle taxi rider. Paano nga ba mag-apply bilang FoodPanda rider? Narito ang mga hakbang o steps upang mapabilang sa isa sa mga nangungunang online food delivery service company sa Pilipinas.

Related Article: How to Register Your Food Business in Foodpanda

FoodPanda Rider Application Requirements

Dahil online ang application, kailangan mo munang siguraduhin na kumpleto ang inyong requirements:

  1. Motorsiklo o Bisikleta
  2. BIR Tax Identification Number (TIN)
  3. Professional Driver’s License (kung motorsiklo ang gagamitin).
  4. LTO Registration (OR/CR) (kung motorsiklo ang gagamitin).
  5. P500 (for uniform and bag)
  6. At least 2 Government Issued IDs
  7. Verified GCash Account

Step 1 – Pumunta sa rider.foodpanda.ph. Piliin ang inyong area at sasakyan na gagamitin (motorsiklo o bisikleta).

Food Panda Application page

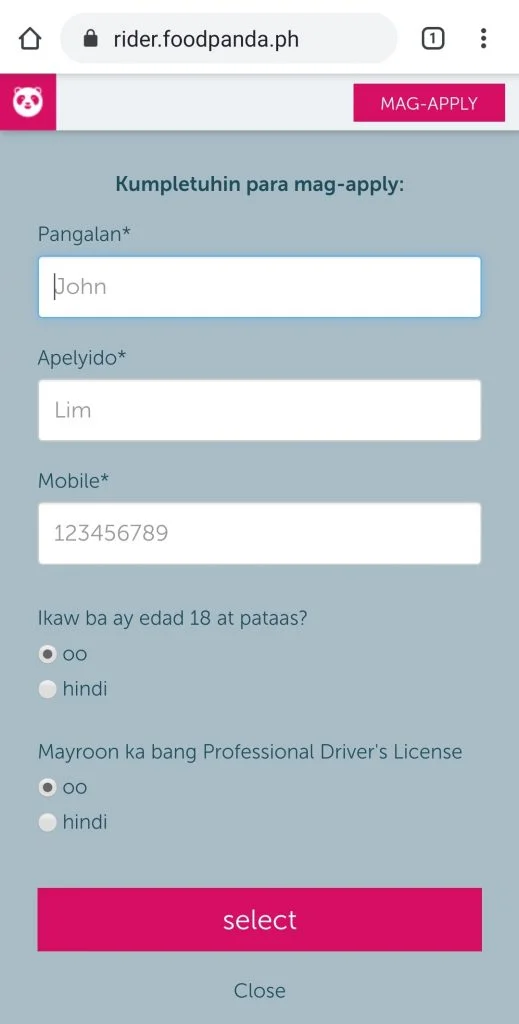
Step 2 – Ilagay ang inyong personal information gaya ng pangalan, apelyido, at mobile number.

Profile page

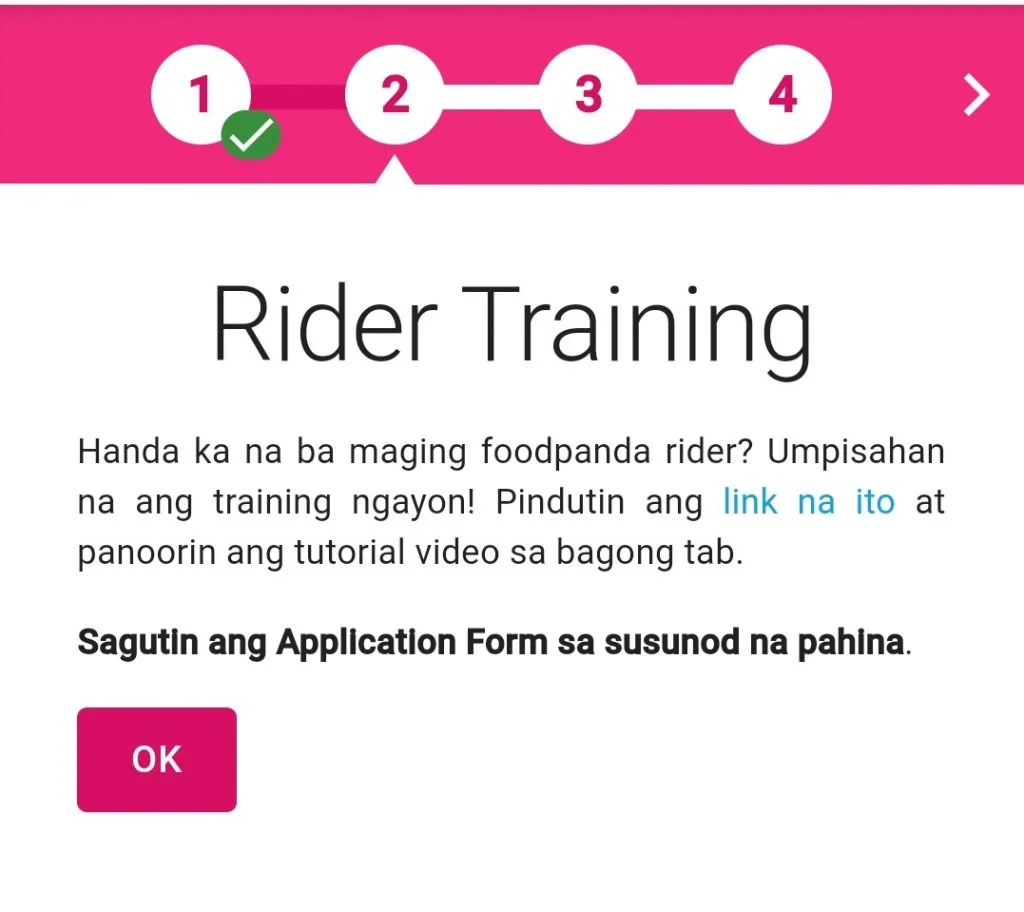
Step 3 – Panoorin ang tutorial video.

Watch the tutorial video

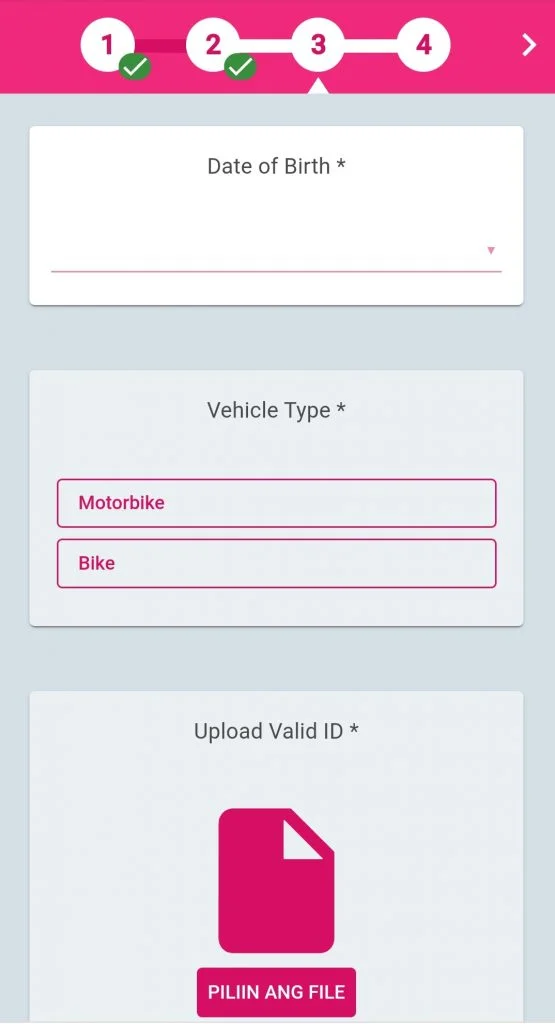
Step 4 – Sagutin ang application form at mag-upload ng valid ID.

Form and Valid ID

Step 5 – Ihanda ang inyong GCash account. Ilagay ang lahat ng detalye na kailangan.

Have a GCash Account ready

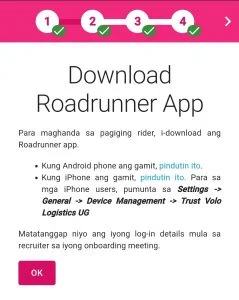
Step 6 – I-download ang Roadrunner app. Makukuha ang inyong username at password sa onboard meeting.

Download Roadrunner App

Step 7 – I-download ang Telegram app at gumawa ng account.

Set up Telegram

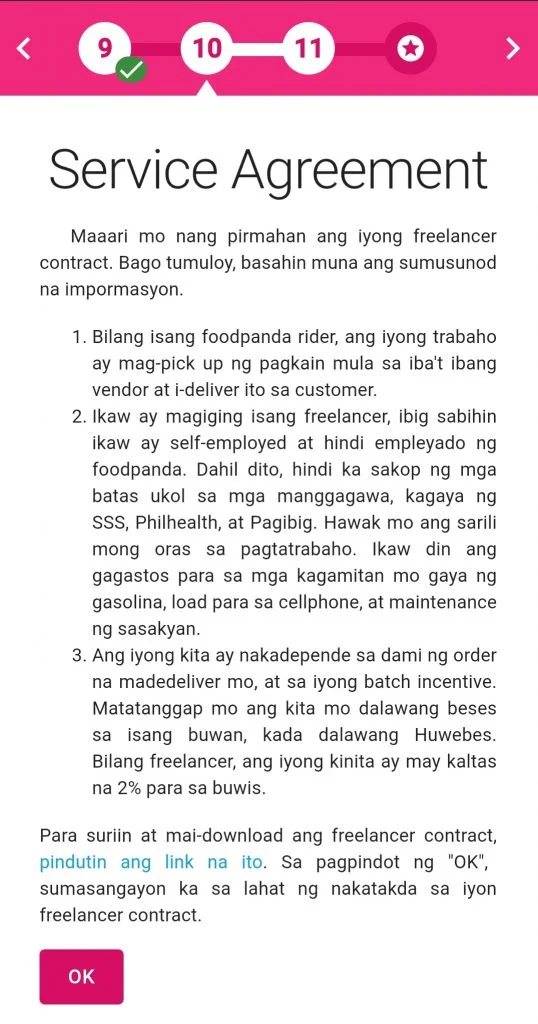
Step 8 – Pindutin ang “ok” sa Service Agreement.

Service Agreement

Step 9 – Hintayin ang tawag mula sa recruiter upang ma-finalize ang inyong application.

Paalala: Maaring tumagal ang pag-proseso ng inyong application dahil sa dami ng mga applicant.

ALAMIN: Paano Mag-Apply sa Mr. Speedy | Byahe Agad

Frequently Asked Questions

Puwede bang gumamit ng non-professional driver’s license sa pag-apply?

Kailangan po na professional driver’s license ang gamitin sa pag-apply. Hindi na po pinapayagan ang non-pro.

May kailangan bang bayaran sa pag-apply FoodPanda?

Kailangan lang po ng P500 na pambayad sa uniform at bag na inyong gagamitin.

Anu-anong sasakyan ang puwedeng gamitin?

Maaaring gumamit ng motorsiklo o bisikleta.

Gaano katagal ang bago ka matawagan ng recruiter tungkol sa inyong application?

Sa ngayon ay walang eksaktong araw, ngunit tatawagan naman kayo sa lalong madaling panahon. Antayin niyo lang po dahil medyo marami ang nag-a-apply sa kasalukuyan.

In addition to serving delicious fries, Potato Corner has made a name for itself by being one of the best options for people who want to have a franchise business. Their rates are reasonable and they have an impressive system for assessing their prospective franchisees to ensure their success.

If you have what it takes to make a fortune from selling their beloved fried potatoes, use this step by step process so you can plan accordingly and make this exciting business opportunity a reality.

5 Steps to Start a Potato Corner Franchise

STEP 1 – Know the franchise packages offered by Potato Corner

Potato Corner has several franchise packages that you can choose depending on your business plans and, of course, budget.

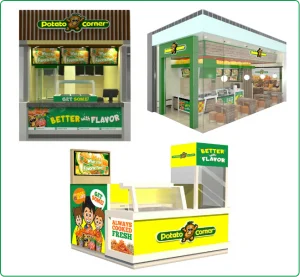
School Cart

Potato Corner School Cart
  • P257,600 (inclusive of VAT and franchise fee valid for 3 years)
  • With fryer, freezer, small wares, and initial supplies
  • With franchisee training, crew training, and 1 set of crew uniform
  • Can only be placed in schools

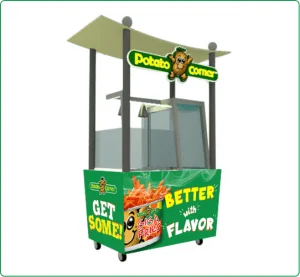
Standard Cart

Potato Corner Standard Cart
  • P431,200 (inclusive of VAT and franchise fee valid for 5 years)
  • With fryer, freezer, small wares, and initial supplies
  • With franchisee training, crew training, and 1 set of crew uniform
  • Allowed in most locations like malls, transport terminals, and commercial areas

Customized Store

Potato Corner Customized Store
  • P296,800 (inclusive of VAT and franchise fee valid for 5 years) + Actual Cost of Construction
  • With fryer, freezer, small wares, and initial supplies
  • With franchisee training, crew training, and 1 set of crew uniform
  • For locations with specified areas like food courts and mall spaces

STEP 2 – Secure the perfect location

Identifying the ideal spot for your Potato Corner store will be challenging, but very rewarding if you do everything right. Take note that Potato Corner itself cannot assist you with finding a location, so you will have to do the scouting and evaluation yourself. Of course, you are free to consult business experts for advice. Once you’ve found a spot, you can start negotiating with the property owner until you obtain a lease offer, which is an important requirement for your Potato Corner franchise application.

STEP 3 -Apply for a Business Permit

Once you’ve finalized your location, you can start applying for a business permit. For sole-proprietorship, head to the Department of Trade and Industry (DTI). For corporation or partnership, register at Securities and Exchange Commission (SEC). After that, go to the city hall or municipal hall to apply for your business permit (also known as Mayor’s Permit). Remember that the procedures and requirements may vary depending on the city or municipality.

STEP 4 – Plan manpower

Upon receiving your business permit, you can plan manpower for your Potato Corner franchise, which includes hiring, schedule, salary, and their mandatories (SSS, PhilHealth, and Pag-IBIG).

STEP 5 – Apply for your Potato Corner franchise

Once you’ve done the (rather tedious) first four steps, you can finally submit your application for a Potato Corner franchise. You need to upload the following requirements on the Potato Corner website:

  • Letter of Intent
  • 2 Valid IDs
  • Qualification form (downloaded from the Potato Corner website
  • Market Study (also from the website)
  • Lease Offer
  • Draft of Contract

It could take roughly a month for your application to get approved. Once okay, you will go through a series of activities with the franchise team of Potato Corner to prepare you for the opening of your store. They will inspect your chosen location, hold a kick-off meeting, schedule your contract signing and payment, discuss construction (if applicable), and train your staff.

After completing step 5, pat yourself on the back because you’ve just become a Potato Corner franchisee. Good luck and enjoy selling delicious fries!

potato corner inquiries

By the way, Potato Corner announced that it will be waiving franchise and royalty fees for the year 2020. For new applications, you can expect your investment to be cheaper by P100,000 or more!

When filing your application, be sure to inquire about this limited-time promo. You may also contact 09177065204 to know more.

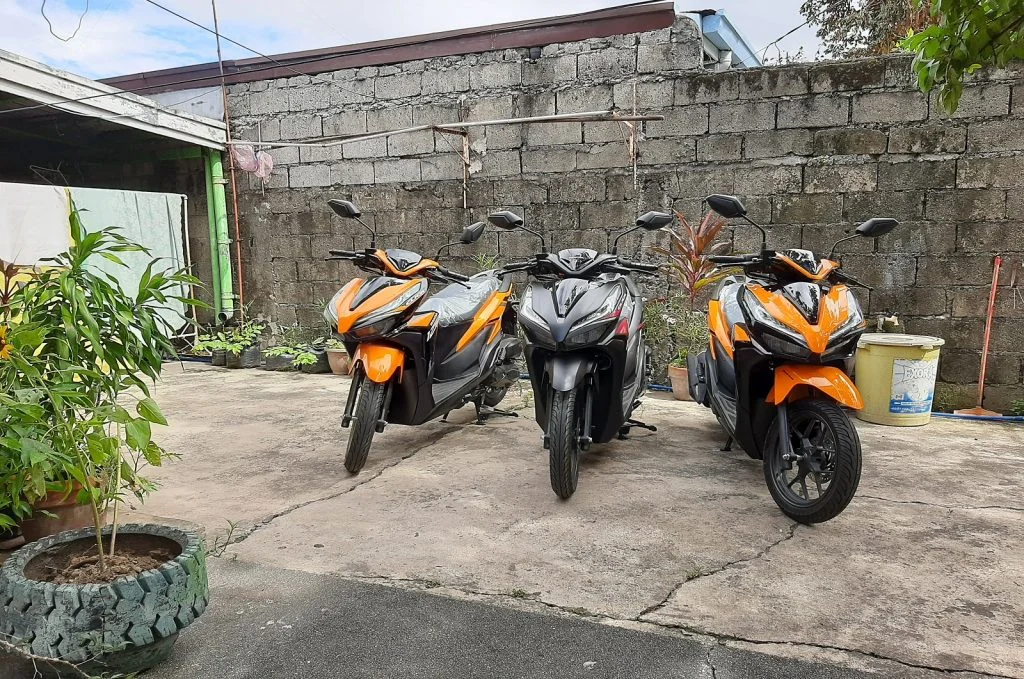
Nais mo bang magkaroon ng sariling motor pero hindi ka makakuha sa mga dealer? Kung ang sagot mo ay oo, narito na ang isa pang pagkakataon para makakuha ka ng motor sa pamamagitan ng tinatawag na boundary hulog. Ang boundary hulog ay isang paraan para makakuha ka ng sasakyan sa pamamagitan ng pagbayad araw araw sa iyong operator.

Para Kanino Ang Boundary Hulog

Ang boundary hulog ay hindi para sa lahat. Ito ay gagawin mo lamang kapag hindi ka makakuha ng motor sa dealer sa dahilanang hindi ka nakatapos sa dati mong kinuhan motor, wala kang trabaho or ano pa mang dahilan. Ang pagkuha ng boundary hulog ay hindi basta basta dahil kadalasang 1 year to pay lang ang mga ito at mabigat ito sa bulsa kung wala kang tamang diskarte.

Magkano Binabayaran sa Boundary Hulog?

Bawat operator ay may kanya-kanyang paraan sa pagcompute ng daily boundary. Dito sa amin, kapag kumuha ka ng motor sa dealer at 3 taon mo babayaran sa dealer, ang kabuoang ihuhulog mo ng tatlong taon sa dealer ay 1 taon mo lang babayaran kapag kumuha ka ng boundary hulog. Dahil dito mabilis mo syang mababayaran at maaga ka makatapos sa paghuhulog.

Ganito ang sample computation for Honda Click 125i. Ang monthly ammortization sa Honda Click 125i ay 3,800 persos per month kung sa dealer ka kukuha. Ang kabuoang ibabayad mo ay 133,200. Sa Boundary hulog, mas mababa lang ng konti ang babayaran mo pero mas maaga mo ito matatapos bayaran.

Sa isang linggo, ang babayaran mo lang ay 2,190 pesos, 365 pesos kada araw, bukod sa Linggo. Ang bayad ay ipapadala sa Gcash.

DESCRIPTIONDEALERBOUNDARY HULOG
# of Months to Pay3612
Total Amount to Pay133,200113,800


Boundery Hulog for GrabCar Drivers

Ano ang mga motor na pagpipilian?

Sa ngayon, ang available lang na motor ay Honda Click 125i (365 PHP per day). Ang araw ng Lingo ay araw ng pahinga kaya ito ay libre at walang bayad.

Requirements for Boundary Hulog

  1. MERALCO Bill kung saan ka nakatira
  2. Proof of income (proof kung paano ka kumikita)
  3. NBI clearance
  4. Driver’s License
  5. Signed contract (manggagaling ito sa amin)

Paano mag apply?

Click mo lang ang application form at basahin mabuti ang mga tanong bago ito sagutan. Ikaw ay makakatanggap ng tawag kung ikaw ang mapipiling kandidato para sa application.

Click the application form here.

Katulad ng Grab at Lalamove, ang Mr. Speedy ay isang delivery service na tumutugon sa mga delivery request ng kanilang dumaraming customer. Kung ikaw ay may motorsiklo o sasakyan tulad ng kotse o van, maari kang mag-apply bilang courier sa Mr. Speedy. Narito ang mga requirements na kailangan mo para sa Mr. Speedy application.

Read Next: Joyride Application Process for Drivers

Mr. Speedy Application Requirements

Ang maganda sa pag-apply sa Mr. Speedy ay hindi mo na kailangang pumunta sa kanilang opisina—kailangan lang i-download ang kanilang courier app kung saan mo ipapasa/ipapakita ang mga sumusunod na requirements:

  1. BIR Tax Identification Number (TIN)
  2. Driver’s License
  3. NBI o Police Clearance
  4. LTO Registration (OR/CR)
  5. At least P300 for top-up amount
  6. Vehicle: Motorsiklo, Kotse (Sedan, SUV, etc.), Van (L300, Light Truck, etc.

How to Apply as a Mr. Speedy Courier

Step 1 I-download ang Mr. Speedy COURIER APP. Iba ito sa kanilang app para sa mga gustong magpa-deliver.

Step 1: Download Mr Speedy on Google Play or IOS Appstore

Step 2 – Buksan ang app at piliin ang REGISTRATION.

Step 2: Click "Registration" Button to register

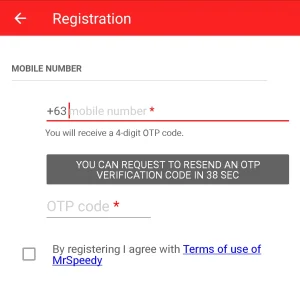
Step 3 – Ilagay ang inyong mobile number at mag-request ng OTP (one time password). Kapag nakuha na ang OTP. Huwag kalimutang i-tap ang “By registering I agree with Terms of use of MrSpeedy” upang magpatuloy.

Step 3: Enter mobile number and OTP code that will be sent to your mobile number.

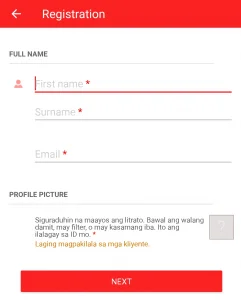
Step 4 – Ilagay ang inyong buong pangalan: First Name at Surname (Apelyido), Email Address, at Larawan.

Step 4: Enter name and email

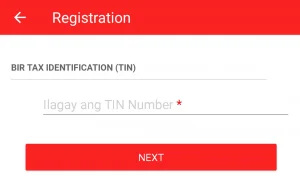
Step 5 – Ilagay ang inyong BIR Tax Identification Number o TIN.

Step 5: Enter Tax Identification number

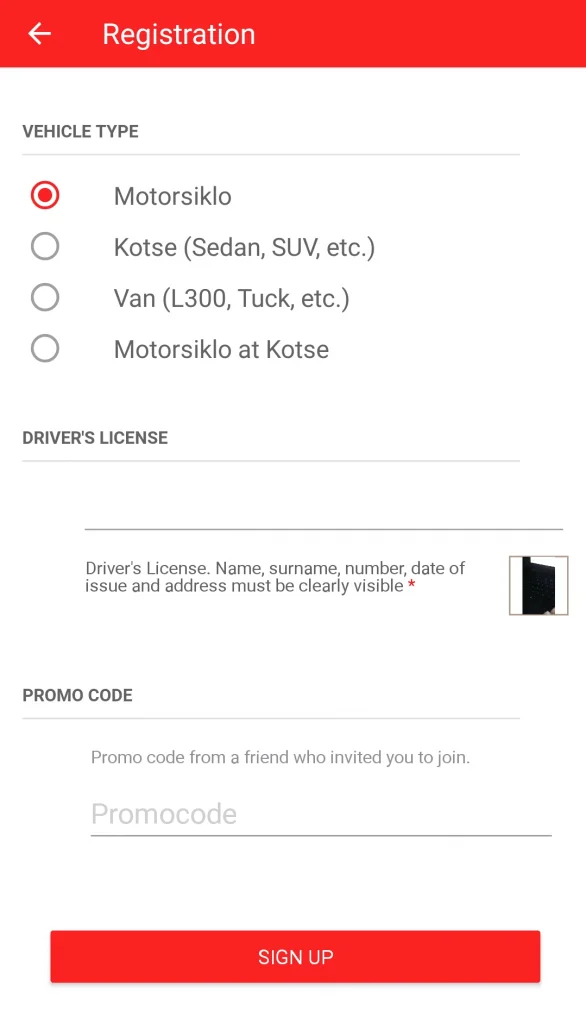
Step 6 – Piliin ang sasakyan na gagamitin. Ilagay ang number ng inyong lisensya or driver’s license. Pagkatapos, pindutin ang SIGN UP.

Step 6: Select the vehicle that you want to register.
300300

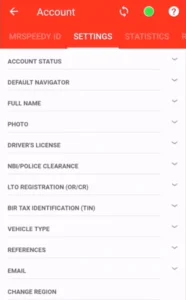
Step 7 – Habang hinihintay ang activation ng registration, pumunta sa SETTINGS.

Step 7: Go to settings

Step 8 – Under DEFAULT NAVIGATOR, ilagay kung Google Maps o Waze ang gagamitin.

TIP: Ayon sa maraming rider, mas madaling gamitin ang Waze.

Step 9 – I-fill out ang lahat ng mga detalye sa FULL NAME, BIR TAX, VEHICLE TYPE, REFERENCES, at EMAIL. Sa references, maaring ilagay ang detalye ng inyong kamag-anak.

Step 10 – Siguraduhing naka-upload ang inyong PHOTO at kopya ng inyong DRIVER’S LICENSE, NBI/POLICE CLEARANCE, at LTO REGISTRATION.

Step 11 – Pagkatapos ma-submit ang requirements, pumunta sa http://bit.ly/mrspdy at sagutan ang exam. Kailangang mong makakuha ng 80% upang pumasa.

Step 12 – Kapag na-approve na ang inyong account, pumunta sa mrspeedy.ph/topup at sundin ang proseso sa pag-top up. Ang minimum na maaring i-top up ay P300. Hintayin ang confirmation sa loob ng 2-3 araw.

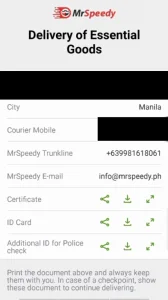
Step 13 – Kapag pumasok na ang P300 sa inyong Mr. Speedy Account, pumunta sa MRSPEEDY ID at i-download ang inyong Certificate, ID Card, at additional ID for Police check. Ipa-print ang mga ito at ipa-laminate.

Step 13: Download certificate ID

Kapag nagawa nyo na ang lahat ng iyan, congratulations! Puwede na kayong kumuha ng biyahe bilang isang Mr. Speedy Courier!

Frequently Asked Questions

⭐ Puwede bang gumamit ng non-professional driver’s license sa pag-apply?

Hindi. Ayon sa gobyerno, ang mga driver na kumikita sa pagmamaneho ay kinakailangang may professional driver’s license.

⭐ May kailangan bang bayaran sa pag-apply sa Mr. Speedy?

Ang pag-aapply sa Mr. Speedy ay libre, ngunit kailangang mag-top up ng P300 upang magkaroon ng paunang laman ang inyong Mr. Speedy account. Kailangan rin ng P1000 cash bond.

⭐ Anu-anong sasakyan ang puwedeng gamitin?

Maaaring gumamit ng motorsiklo, van, light truck, sedan, at SUV.

⭐ Pwede bang mag-apply kahit non-pro lang ang lisensya?

Hindi po. Professional driver’s license po ang kailangan.

Parami na ng parami ang paraan para kumita gamit ang iyong motorsiklo. Isa na rito ang tinatawag na door-to-door item delivery service and restaurant-to-door food delivery service. Isa sa mga kumpanya na nagbibigay ng ganitong serbisyo ay ang Lalamove Philippines. Ang Lalamove app ay isang mobile application kung saan ang isang tao ay maaring magpadala ng isang gamit papunta sa nais na drop-off location. Ang item na ipapadala ay kukunin ng motorcycle ride at ihahatid sa nakatakdang lokasyon. Ang isang full-time Lalamove driver ay kayang kumikita ng 800 to 1500 Pesos sa isang araw. Malaki ang kita sa Lalamove pero paano mag-apply sa Lalamove? Narito ang requirements at ang proseso.

Read Next: TokTok Application Process and Requirements for Riders

Kumita Gamit ang Lalamove Mobile App

Lalamove Application Requirements

Importante na ihanda muna ang requirements bago nyo subukang mag-apply sa Lalamove. Hindi ipro-process ang inyong application kapag kulang ang inyong requirements. Narito ang kumpletong listahan ng rrquirements ang dapat nyo ihanda.

Mga Requirements na i-uupload sa Mobile App

  1. Photo of NBI clearance
  2. Photo of vehicle – back potion with plate number (malinaw dapat ang kuha ng plate number)
  3. Photo of vehicle – front portion of the vehicle
  4. Photo of vehicle – side portion of the vehicle
  5. Profile Picture

Mga Requirements na Isusubmit sa Lalamove Office

  1. Professional Driver’s license
  2. Original copy of NBI Clearance
  3. OR/CR and/or Deed of sale
  4. Letter of authorization (if vehicle is not owned)
  5. Cash bond: Php 2000.00
  6. Initial Top-up: Php 500.00

Also read: Alamin kung Paano Sumali sa Angkas

Paano Mag-Apply sa Lalamove (How to Apply)

Kapag kumpleto na ang inyong requirements, nakadali lang mag-apply sa Lalamove. Narito naman ang proseso:

  1. Pumunta sa Lalamove website
  2. I-download ang Lalamove app
  3. Mag register sa driver app
  4. i-upload ang mga requirements

Read: How to Apply – GrabBike Application Process

Frequently Asked Questions

⭐ Can I apply using non-professional driver’s license?

No. The government requires all drivers that generates income from driving to have professional driver’s license.

⭐ How much does it cost to apply with Lalamove?

Technically speaking, there is no application cost but you need to prepare 2,000 Pesos as security deposit and 500 Pesos for initial top up. The 2,000 Pesos is refundable.

⭐ What vehicle can I use?

Vehicle with 100cc and above displacement with Year model not later than 2018.

Nearly 4 years ago, Grab Philippines closed its GrabBike application after the government declared its operations illegal due to a lack of laws and guidelines surrounding it. With Ankgas, Joyride and Move It taking part in LTFRB’s technical working group (TWG), Grab is planning to relaunch GrabBike with 15,000 riders. It is only a matter of time before Grab starts accepting applicants.

If you are planning to apply as a rider for Grab, be sure to have the requirements ready. Remember, they will only accept 15,000 riders which is why it is important that you have the requirements ready once they opened the application.

Read Next: Joyride Application Process for Drivers

GrabBike Application Requirements

It is very easy to apply as GrabBike rider. There are at least 6 requirements that you need to complete and a minimum age requirement of 20 before you can apply as a rider.

  1. Motorcycle or scooter must be at least 125cc or higher
  2. Photocopy of OR/CR or sales invoice of the motorcycle
  3. Professional driver’s license with 1 as the restriction code
  4. NBI clearance
  5. Police clearance or Barangay clearance
  6. Smartphone
  7. Authorization letter (if you are not the owner of the vehicle)
  8. Fit to Work Medical Certificate (if you are 56 years old and above)
GrabBike Registration Form

How to Apply as GrabBike Rider

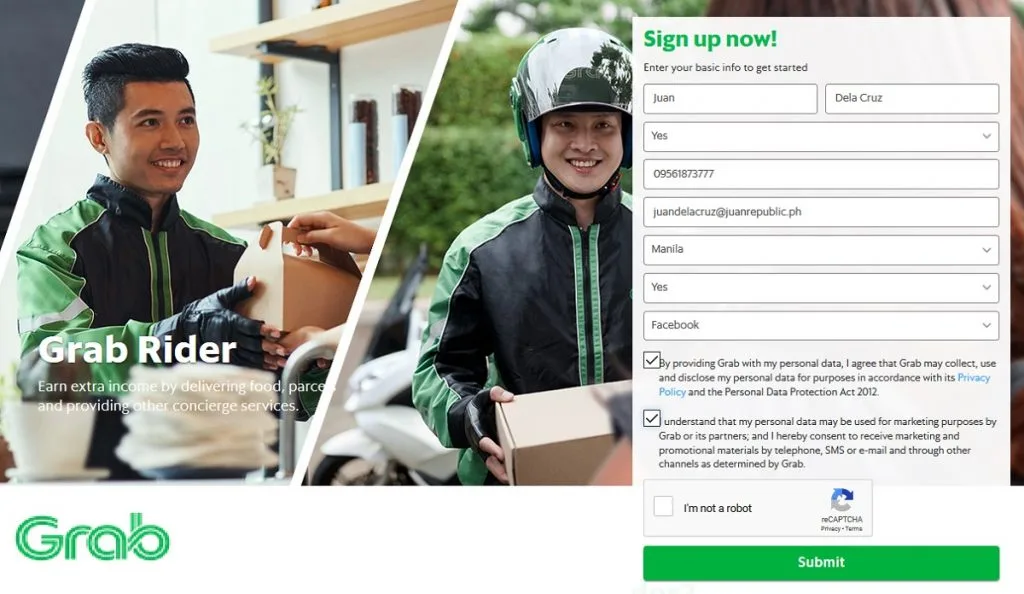
After preparing for the requirements, you are now ready to apply as rider. For online application, you need to fill up GrabBike’s application form and wait for them to contact you. You will be notified by Grab Philippines staff once your application has been approved.

See application process for Joyride, Angkas and Move It.

Frequently Asked Questions

⭐ What models are accepted for GrabBike?

Your unit should be 2018 and up with at least 125cc displacement.

⭐ How much can I earn from GrabBike?

Your income depends on the number of trips you completed. More trips means more income. You can earn from 500 to 2000 pesos per day depending on the number of trips you completed.

⭐ Can I join without SSS number?

Yes. SSS number is not required.

⭐ I don’t have a professional driver’s license, is that okay?

A professional driver’s license is required. You cannot apply without a professional driver’s license.